
Mastering the proper pipetting technique is essential for achieving both accuracy and precision in any laboratory setting. Whether you're handling aqueous solutions, viscous liquids, or volatile compounds, using the correct technique can significantly improve your results and minimize errors, ensuring that your experiments are reliable.
This guide offers a comprehensive overview of different pipetting methods, best practices for various solutions, and tips for maintaining your pipette's performance. By following these recommendations, you can enhance your lab’s efficiency and accuracy.
What we’ll cover in this guide
- Understanding pipettes and key terms
- Air displacement pipettes
- Positive displacement pipettes
- General pipetting guidelines
- Techniques: forward, reverse, and repetitive
- Pipetting different solutions
- Preventing cross-contamination
- Tip selection and calibration
Key Pipette and Pipetting Terms:Adjustment - Altering the pipette so that the dispensed volume is within the specifications. Aspirate - To draw up the sample. Blow-out - To empty the tip completely. Calibration check - Checking the difference between the dispensed volume and the selected volume. Dispense - to deliver the sample. Air displacement pipettes - are meant for general use with aqueous solutions. In air displacement pipettes, a certain volume of air remains between the piston and the liquid. Positive displacement pipettes - are used for high viscosity and volatile liquids. In positive displacement pipettes, the piston is in direct contact with the liquid. Electronic pipette is a battery-powered, microprocessor-controlled pipetting device used in laboratories to accurately aspirate and dispense liquids. Multichannel pipette is a laboratory pipetting tool designed with multiple parallel channels, typically 8, 12, or 16, that allow a user to aspirate and dispense the same volume of liquid into multiple wells at once. Repeater pipette is a laboratory pipetting tool designed to dispense the same volume of liquid repeatedly from a single aspiration. Instead of aspirating for every dispense, the pipette draws up a large volume once using a special syringe-like disposable tip, and then delivers multiple precise, consecutive aliquots with each trigger press. Pipette controller (also called a pipette aid or pipette filler) is a handheld, motor-assisted device used to control the aspiration and dispensing of liquids when working with serological pipettes (typically 1–100 mL). It replaces manual rubber bulbs and provides smoother, more precise handling. |
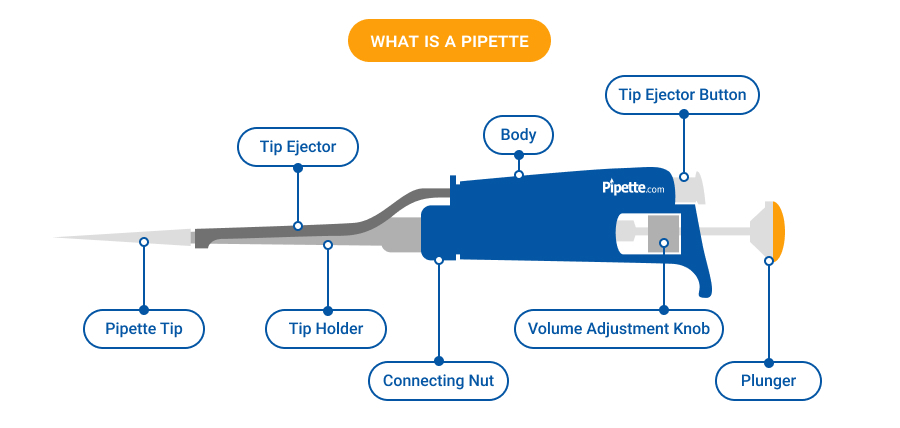
What is a Pipette?
A pipette, also called a micropipette, is a laboratory tool used to transport a measured volume of liquid from one container to another with precision. Pipettes are essential for ensuring accuracy in experiments and come in various types, each suited for specific applications.
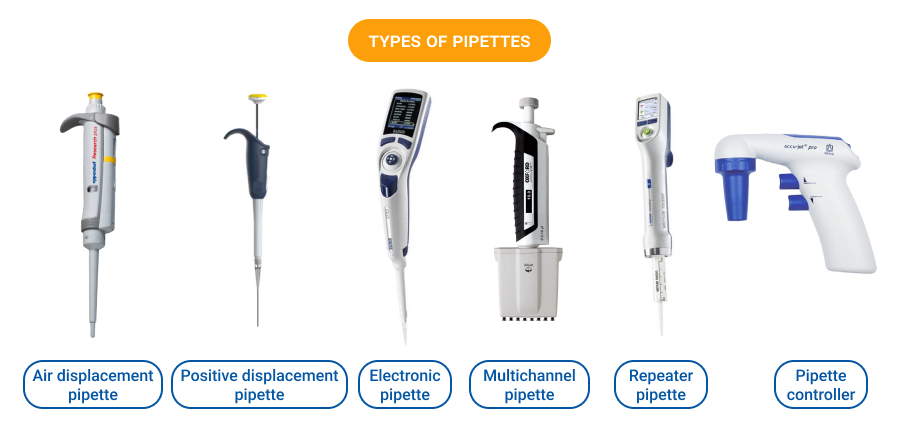
Types of Pipettes:
- Air displacement pipettes
- Positive displacement pipettes
- Electronic pipettes
- Multichannel pipettes
- Repeater pipettes
- Pipette Controllers
What is an Air Displacement Pipette?
An air displacement pipette is the most common type of calibrated pipette and is used for standard pipetting applications, such as measuring and transferring small volumes of liquid; these tools are highly accurate.
However, conditions such as temperature, atmospheric pressure, as well as the specific gravity and viscosity of the solution, may have an effect on the performance of air displacement pipettes.
Best for: Buffers, media, diluted samples and most routine laboratory liquids
Limitations: Can struggle with viscous, volatile or foaming liquids
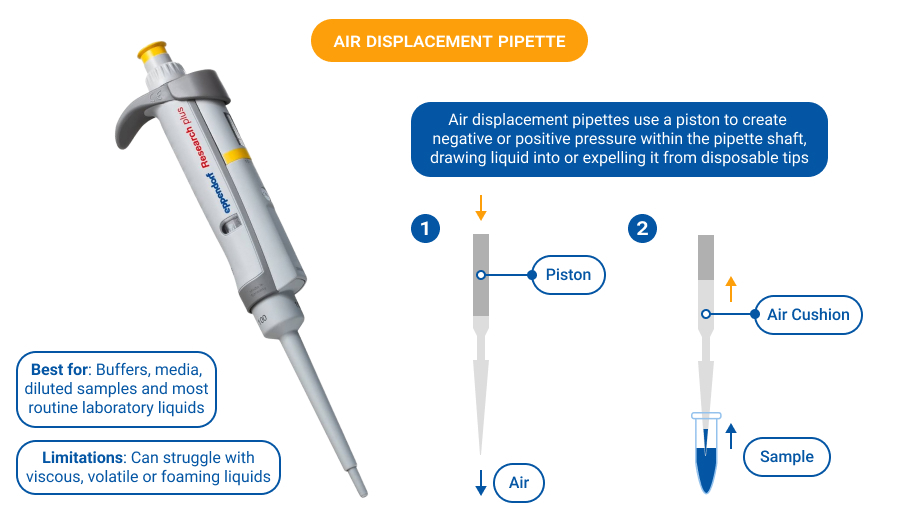
How Does an Air Displacement Pipette Work?
- The piston moves to the appropriate position when the volume is set.
- When the operating button is pressed to the first stop, the piston expels the same volume of air as indicated on the volume setting.
- After immersing the tip into the liquid, the operating button is released. This creates a partial vacuum and the specified volume of liquid is aspirated into the tip.
- When the operating button is pressed to the first stop again, the air dispenses the liquid. To empty the tip completely the operating button is pressed to the second stop (blow out).
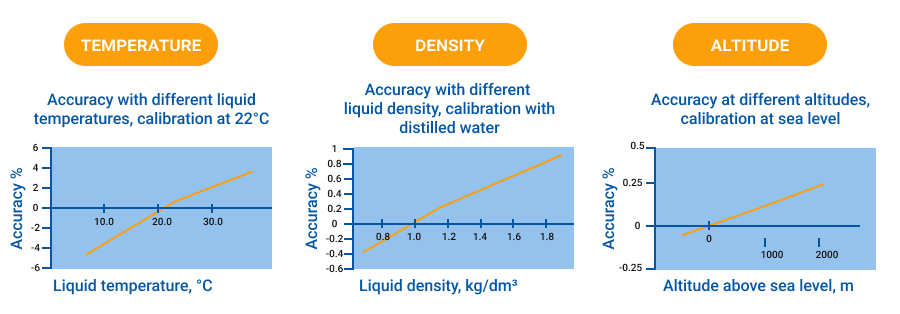
FACTORS AFFECTING THE ACCURACY OF AIR DISPLACEMENT PIPETTES
Temperature
The most important factor in pipetting accuracy is the liquid temperature. The figure below shows the change in volume when the liquid has a different temperature than the pipette and air. If the temperature of the liquid, pipette and air is the same, the accuracy is not significantly affected.
Density
Density is the mass/volume ratio of the liquid. The density varies according to the temperature and air pressure. Typically, the density of water is 0.996 kg/dm3, for ethanol 0.79 kg/dm3 and for sulfuric acid (H2SO4) 1.85 kg/dm3.
Altitude
The geographic altitude affects the accuracy through the air pressure. The air pressure decreases at higher altitudes and the conversion factor Z decreases as well. The boiling point of some liquids can also change to quite close to room temperature, increasing the evaporation loss dramatically.
What is a Positive Displacement Pipette?
A positive displacement pipette is a type of pipette designed for handling high-viscosity or volatile liquids. Unlike air displacement pipettes, a positive displacement pipette has a piston that comes in direct contact with the liquid, ensuring accurate and precise measurements.
This design reduces the risk of contamination and evaporation, making it ideal for sensitive applications like PCR or working with volatile compounds. Notable examples include the Transferpettor, Socorex Acura 841 and Drummond's micro dispensers.
Best for: Viscous solutions (glycerol, oils), volatile solvents (ethanol, chloroform), corrosive chemicals and high-density liquids
Trade-offs: Higher consumable costs, more frequent tip changes required
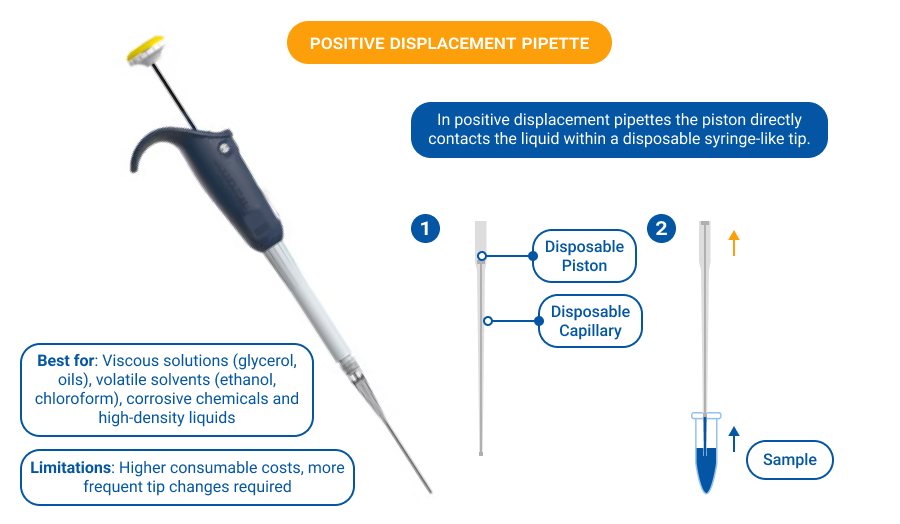
HOW DOES A POSITIVE DISPLACEMENT PIPETTE WORK?
- The piston moves to the appropriate position when the volume is set.
- When the operating button is pressed to the stop, the piston descends to the tip opening.
- After the tip is immersed into the liquid, the operating button is released. The plunger is then raised and a partial vacuum is created. This causes the liquid to enter the tip.
- When the operating button is pressed again, the piston descends, expelling the liquid from the tip.
General Pipetting Guidelines and Proper Pipetting Techniques
General Pipetting Best Practices - For All Pipettes
- Check your pipette at the beginning of your working day for dust and dirt on the outside. If needed, wipe with 70% ethanol.
- Set the volume within the range specified for the pipette.
- Hold the pipette so the "grippy finger rest" rests on your index finger.
- To maximize accuracy, the pipette, tip and liquid should be at the same temperature.
- Check that you are using tips recommended for this pipette. To ensure accuracy, use only high-quality tips made from contamination-free polypropylene.
- Tips are designed for single use. They should not be cleaned for reuse as their metrological characteristics will no longer be reliable.
- *Pre-rinsing (1-3 times) the tip with the liquid to be pipetted may improve accuracy, especially when using positive displacement tips.
- Avoid turning the pipette on its side when there is liquid in the tip. Liquid might go to the interior of the pipette and contaminate the pipette.
- Avoid contamination to or from fingers by using the tip ejector and gloves.
- Store pipettes in an upright position when not in use. Pipette stands are ideal for this purpose.
- Check calibration regularly, depending on the frequency of use and on the application, but at least once a year. If used daily, a three-month interval is recommended. Follow the instructions for recalibration in the manufacturer’s instruction manual, or send your pipettes to an ISO certified laboratory for calibration.
Pipeting techniques
Liquid-handling accuracy in the laboratory depends not only on the type of pipette used but also on the technique applied, with different methods optimized for different liquid properties and workflow needs.
Forward pipetting is the standard technique used for most aqueous solutions.
Reverse pipetting, by contrast, is preferred for viscous, foamy, or volatile liquids because it aspirates a slightly larger volume and dispenses only the target volume, leaving a small residual amount in the tip to reduce air bubble formation and improve dispensing consistency.
Repetitive pipetting differs from both in that a large volume is aspirated once and then dispensed in multiple equal aliquots, making it ideal for high-throughput tasks such as plate filling or reagent distribution.
Together, these techniques offer flexibility for handling different liquid properties and workflow demands, balancing accuracy, precision, and efficiency.
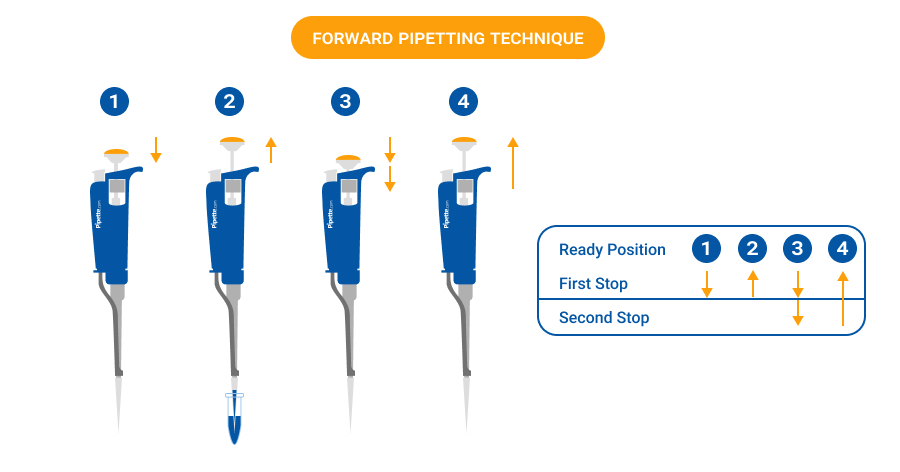
Forward Pipetting Technique: How to Perform the Forward Pipetting Technique
The forward pipetting technique is the most common method used for transferring liquids in laboratory settings, and is used with the common air displacement pipette. This technique ensures precise volume measurement and is ideal for aqueous solutions. It involves aspirating and dispensing the liquid in a controlled manner to ensure accuracy.
- Press the operating button to the first stop.
- Dip the tip into the solution to a depth of 1 cm, and slowly release the operating button. Wait 1-2 seconds and withdraw the tip from the liquid, touching it against the edge of the reservoir to remove excess liquid.
- Dispense the liquid into the receiving vessel by gently pressing the operating button to the first stop and then press the operating button to the second stop. This action will empty the tip. Remove the tip from the vessel, sliding it up the wall of the vessel.
- Release the operating button to the ready position.
Reverse Pipetting Technique: How to Pipette High Viscosity Liquids
The reverse technique is used for pipetting solutions with a high viscosity or a tendency to foam. Reverse pipetting is only possible with air displacement pipettes
- Press the operating button to the second stop.
- Dip the tip into the solution to a depth of 1 cm, and slowly release the operating button. This action will fill the tip with a volume that is larger than the set volume. Wait 1-2 seconds and withdraw the tip from the liquid, touching it against the edge of the reservoir to remove excess liquid.
- Dispense the liquid into the receiving vessel by pressing the operating button gently and steadily to the first stop. This volume is equal to the set volume. Hold the button in this position. Some liquid will remain in the tip, and this should not be dispensed.
- The liquid remaining in the tip can be pipetted back into the original solution or disposed together with the tip.
- Release the operating button to the ready position.

Repetitive Pipetting Techniques for Repeater and Electronic Pipettes
This technique is intended for repeated pipetting of the same volume. Can only be used with electronic and repeater pipettes.
- Press the operating button to the second stop.
- Dip the tip into the solution to a depth of 1 cm, and slowly release the operating button. Withdraw the tip from the liquid, touching it against the edge of the reservoir to remove excess liquid.
- Dispense the liquid into the receiving vessel by gently pressing the operating button to the first stop. Hold the button in this position. Some liquid will remain in the tip, and this should not be dispensed.
- Continue pipetting by repeating steps 2 and 3.

Recommendations for Pipetting Different Solutions / Compounds
| Type of Liquid | Examples | Recommended Pipette Type | Recommended Tips | Pipetting Technique |
| Aqueous / Low-Viscosity Liquids | Buffers, saline, water, diluted reagents | Standard single- or multichannel air-displacement pipette | Standard polypropylene tips | Forward pipetting |
| Viscous Liquids | Glycerol, detergents, serum, syrups | Air-displacement or positive-displacement pipette | Low-retention tips | Reverse pipetting |
| Volatile Liquids | Alcohols (ethanol, methanol), acetone, chloroform | Positive-displacement pipette | Positive-displacement tips | Reverse pipetting |
| Foaming Liquids | Protein solutions, surfactants, cell culture media w/ serum | Air-displacement pipette | Low-retention tips | Reverse pipetting |
| Sticky / Adherent Liquids | DNA solutions, concentrated proteins, PEG solutions | Air-displacement or positive-displacement pipette | Low-retention tips | Reverse pipetting |
| Hazardous or Infectious Liquids | Blood, clinical samples, toxic chemicals | Positive-displacement pipette | Positive-displacement tips | Forward pipetting |
| Cold Liquids | Enzymes, chilled buffers, cold alcohol | Air-displacement pipette | Low-retention tips | Reverse pipetting |
| High-Throughput Dispensing / Plate Filling | ELISA reagents, PCR master mix aliquoting | Electronic multichannel or repeater pipette | Standard or low-retention tips | Repetitive pipetting |
| Small Volumes (<5 µL) | qPCR reagents, primers, dyes | High-precision air-displacement or electronic pipette | Filtered low-retention micro-tips | Forward pipetting (slow movements) |
| Corrosive Liquids | Strong acids/bases (HCl, NaOH), bleach | Positive-displacement pipette | Chemical-resistant disposable syringes | Forward pipetting |
Best Practices for Proper Pipetting Techniques
Ensuring optimum performance
Error-free pipetting requires both precision and accuracy. A number of factors can effect these specifications, which are the main quantitative parameters for evaluating pipette performance.
What are accuracy and precision?
Accurate, but not precise: The mean volume is the correct (set) volume, but separate pipettings differ from the set volume.
Precise, but not accurate: There is no variation between the separate pipettings, but the mean volume differs from the set volume.
Accurate and precise: The mean volume is the set volume and there is no variation between different pipettings.
Importance of Pipetting Position
Proper pipetting position is crucial for achieving accurate and consistent liquid handling. Holding the pipette vertically during aspiration ensures the correct volume is drawn into the tip without air bubbles, while dispensing at a slight angle helps the liquid release smoothly. Correct tip immersion depth prevents over- or under-aspiration, and stable hand positioning reduces variability between samples. By maintaining consistent angles, depth, and posture, users minimize technique-related errors and improve the reliability of experimental results.
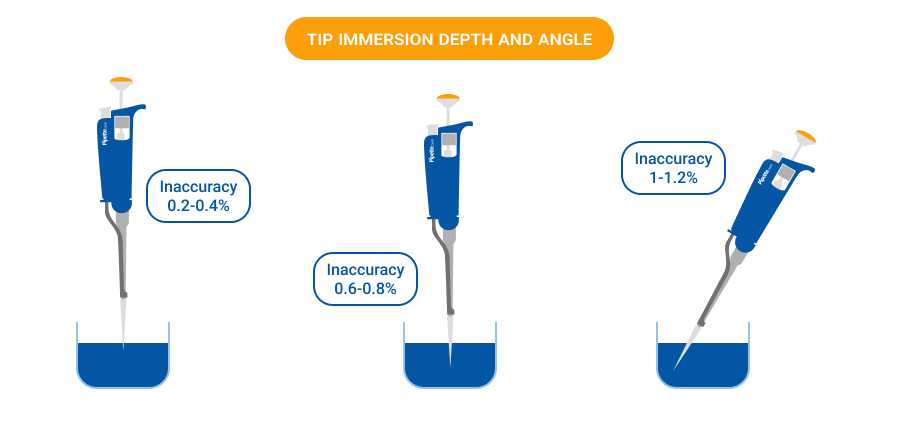
The depth and angle of pipette tip immersion have a direct impact on pipetting accuracy:
-
Shallow immersion (~1 cm), pipette held vertically
-
Inaccuracy: 0.2–0.4%
-
Proper technique for most liquids.
-
The tip should be immersed only about 1 cm to avoid excess hydrostatic pressure.
-
-
Moderate immersion (~3 cm), pipette held vertically
-
Inaccuracy: 0.6–0.8%
-
Immersing the tip deeper than necessary increases the pressure on the air cushion, leading to over-aspiration and reduced accuracy.
-
-
Deep immersion (3–4 cm) with pipette tilted at 30–40°
-
Inaccuracy: 1–1.2%
-
Tilting the pipette and immersing too deeply compound errors, increasing variability and the likelihood of drawing air or excess liquid.
-
Errors become more significant when working with small volumes, such as when using a 1–10 µL pipette. Keeping the pipette vertical and the tip just slightly submerged improves accuracy and consistency.
Preventing Cross-Contamination
1. Pipette-to-sample
A contaminated pipette or contaminated tips can cause contamination of samples.
Prevention:
- Use sterilized tips or sterilized filter tips and if possible autoclave the pipette.
- Change the tip after pipetting of each sample.
2. Sample-to-pipette
Samples or aerosols from samples can enter the cone of the pipette.
Prevention:
- Keep the pipette vertical when pipetting in order to prevent liquid from running into the pipette body.
- Release the push-button slowly.
- To avoid aerosol contamination, use filter tips or use a positive displacement pipette and tips.
- Store the pipette vertically.
3. Sample-to-sample (carry-over)
The remains of sample A can mix with next sample B inside the tip and may cause a false test result.
Prevention:
- Change the tip after each sample.
- If you suspect that your pipette is contaminated, autoclave or clean your pipette.
|
Common Sources of Pipetting Errors
|
Tip Selection: Why It’s Crucial to Choose the Right Tip For Your Pipetting Procedures
One of the most important factors in accurate pipette measurement is the tip. The pipette and the tip form a system.
The best pipetting results are naturally achieved by those manufactured together to ensure complete compatibility between pipettors and pipettor tip.
Many tips on the market look fine, but when studying them more carefully, it appears that the price really reflects quality. Many of the cheap tips may have flashes, protrusions, and scratches, air bubbles, are bent or contain impurities. All these influence pipetting results.
For example, if the tip is not straight this alone may result in a 10% error in pipetting accuracy. Moreover, if the tip orifice is not accurately centered, the dispensing of the liquid might be affected significantly.
If premium grade pure polypropylene is not used or the mold and processing are not up to the highest standards, part of the liquid stays inside the tip as a droplet, which causes an error in the pipetting result.
Guidelines For Selecting Pipette Tips
All tips should be:
- Made to match the pipette in use: It is recommended to use tips specified by the manufacturer as well as high quality Unifit tips.
- Made of high-quality pure virgin polypropylene
- Free from dust or particles
- Uniform in size and shape
- Accurately centered for tip orifice
- Free from metals, like cadmium
- Securely sealed: There should be good tip cone match for a perfect seal and tip eject
- Free from blemishes, flashing or any protrusions
- Highly resistant to chemicals
- Highly stable thermally
- Autoclavable or pre-sterilised for use in sterile applications
- Traceable: Lot numbers and mold cavity identification markings in each tip
Calibrating Your Pipettes
What is Calibration of Pipettes?
Calibration of pipettes, officially means determining the difference between the dispensed volume and the selected volume. Adjustment means altering the pipette so that the dispensed volume is within certain specifications.
During factory calibration, performance is checked with different weighings at both the maximum volumes of the range and at the minimum or 10% of the maximum volume, whichever is higher.
When you purchase a Pipette, you should choose one that is designed to permit recalibration and adjustment for different temperatures and various viscous liquids.
Calibration of Pipettes in a Quality System
The main objective of pipette calibration in a quality system is to ensure that measurements are made with the intended accuracy. Very often error limits are taken from the manufacturer’s specifications, while far less accuracy is required to perform the work.
If these limits are not easily obtained, or vary, another option is to set the limits according to accepted standards (DIN 12650 or ISO 8655). However, if the laboratory work requires the highest accuracy, the manufacturer’s limits should be used.
Basically every user should define their own limits, according to the application used and the ambient conditions.
GENERAL LIQUID HANDLING QUESTIONS
What is the difference between air displacement and positive displacement pipettes?
Both types of pipettes have a piston that moves in a cylinder, or capillary.
In air displacement pipettes, a specified volume of air remains between the piston and the liquid. In positive displacement pipettes, the piston is in direct contact with the liquid. This keeps air from entering the tip, preventing contamination effectively.
Air displacement pipettes are meant for general use with aqueous solutions. Positive displacement pipettes are used for high viscosity and volatile liquids.
How can I pipette viscous liquids?
You can do so using an air displacement pipette with standard or wide orifice tip (reverse pipetting, slowly). An alternative to this is to use a positive displacement system.
How can I prevent liquid dropping out of the tip when pipetting volatile compounds?
If you use air displacement pipettes, aspirate and dispense the liquid a few times keeping the tip in the liquid. By doing so, the air inside the pipette will be saturated with vapor of the volatile compound. It is recommend using positive displacement pipettes for highly volatile compounds, since the built-in piston tip is in direct contact with the liquid.
How accurately can I pipette warm or cold liquids.
The pipettes are calibrated by weighing distilled or de-ionized water of 20 - 25C. With warm liquids, you will get a smaller mass with a certain volume, with cold liquids, you will get a higher mass.


